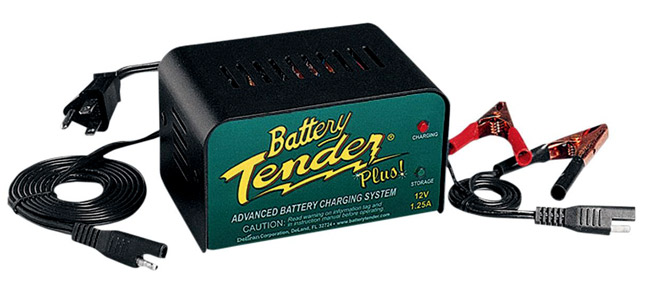
With the Mandatory AHO on motorcycles, every rider will have to add a battery charger to his tool-kit. Buying a new battery every time when your battery runs out of charge isn’t a financially viable option. The best thing is to keep a battery charging kit. So you can always charge up your battery again and save some money both at the same time.
Charging a battery isn’t as simple as just connecting any pair of charging cable to your motorcycle battery. One needs to keep a thing or two in mind before performing this process at home; Including battery rating, charger rating, and the time period required. So let’s dive in. The main thing is to never use any other vehicle's charger kit while charging a battery, don’t cheap out on your equipment and your equipment will never cheap out on you. Battery charging is a sensitive procedure as a different charger can easily damage your battery. Avoid this by using only the specified charger for your battery.
For example, A general rule of thumb is to always use 1/10th of the battery rating in Amp hours. Meaning a 25-amp battery is easily compatible with a 2.5 amps charger to be used over a period of 10 hours.
The second thing is to look for the type of battery you have, is it a Lead acid battery, lithium ion battery or gel battery.
The last step is to figure out the type of charger you need. The most common type of charger is a 'Trickle Charger'. This device converts AC current into DC current and just keeps doing so until the battery is turned off. This type of charger must be used for continuous monitoring and should not be left alone for the long duration of time, as it will keep on charging the battery, even when it’s completely charged.
Another type of charger is “Float Charger”. This type of charger also converts the AC into DC current but also it doesn’t keep charging the battery once it is fully charged. These chargers keep a battery at an optimum level, once it is fully charged. Thus, the battery can be left alone during the charging process.
The last type of charger is a 'Smart Charger', it monitors battery’s charging process. It will charge the battery at different rates throughout the charging process. This reduces the damage done to the battery as suitable current is supplied at each step.
Now, let’s talk about the actual steps you need to follow for a proper charge:
Charging your battery is a good habit. It saves you money and the whole process of taking out and doing the repairs yourself makes you more familiar with your bike. Just make sure that the battery doesn’t get damaged in the whole process because it can hamper the current supply of various circuits in your bike, thus leaving them permanently damaged. So, at the end of the day, keep your parts safe and yourself as well.
For everything related to bikes, stay tuned to BikesMedia.
By: Yetnesh Dubey
Charging a battery isn’t as simple as just connecting any pair of charging cable to your motorcycle battery. One needs to keep a thing or two in mind before performing this process at home; Including battery rating, charger rating, and the time period required. So let’s dive in.
 The main thing is to never use any other vehicle's charger kit while charging a battery, don’t cheap out on your equipment and your equipment will never cheap out on you. Battery charging is a sensitive procedure as a different charger can easily damage your battery. Avoid this by using only the specified charger for your battery.
For example, A general rule of thumb is to always use 1/10th of the battery rating in Amp hours. Meaning a 25-amp battery is easily compatible with a 2.5 amps charger to be used over a period of 10 hours.
The second thing is to look for the type of battery you have, is it a Lead acid battery, lithium ion battery or gel battery.
The last step is to figure out the type of charger you need. The most common type of charger is a 'Trickle Charger'. This device converts AC current into DC current and just keeps doing so until the battery is turned off. This type of charger must be used for continuous monitoring and should not be left alone for the long duration of time, as it will keep on charging the battery, even when it’s completely charged.
Another type of charger is “Float Charger”. This type of charger also converts the AC into DC current but also it doesn’t keep charging the battery once it is fully charged. These chargers keep a battery at an optimum level, once it is fully charged. Thus, the battery can be left alone during the charging process.
The last type of charger is a 'Smart Charger', it monitors battery’s charging process. It will charge the battery at different rates throughout the charging process. This reduces the damage done to the battery as suitable current is supplied at each step.
Now, let’s talk about the actual steps you need to follow for a proper charge:
• Open your battery compartment and disconnect your battery.
• Remove the battery and put it aside. Put a newspaper down before you put the battery down.
• Disconnect the negative terminal (Black) first and then the positive one (red).
• Never charge your battery when it is plugged in as this process will damage wire-harness or even The ECU.
• Work in an open area and always keep any valuable item away from the charging battery.
• Attach the charger to the terminal first and check it thoroughly that they are properly attached.
• Switch ON the electricity.
• In the case of trickle charger, use a multi-meter to test the standing voltage and make sure it is at 12 Volt
• In case of a smart Charger, it will automatically stop charging the battery when it’s fully charged.
• Install the fully charged battery back in its place. First attach the positive cable then the negative one. (Make sure that the order is as mentioned above)
• Put back the battery panel in its place and start the bike.
Final thoughts:• Remove the battery and put it aside. Put a newspaper down before you put the battery down.
• Disconnect the negative terminal (Black) first and then the positive one (red).
• Never charge your battery when it is plugged in as this process will damage wire-harness or even The ECU.
• Work in an open area and always keep any valuable item away from the charging battery.
• Attach the charger to the terminal first and check it thoroughly that they are properly attached.
• Switch ON the electricity.
• In the case of trickle charger, use a multi-meter to test the standing voltage and make sure it is at 12 Volt
• In case of a smart Charger, it will automatically stop charging the battery when it’s fully charged.
• Install the fully charged battery back in its place. First attach the positive cable then the negative one. (Make sure that the order is as mentioned above)
• Put back the battery panel in its place and start the bike.
Charging your battery is a good habit. It saves you money and the whole process of taking out and doing the repairs yourself makes you more familiar with your bike. Just make sure that the battery doesn’t get damaged in the whole process because it can hamper the current supply of various circuits in your bike, thus leaving them permanently damaged. So, at the end of the day, keep your parts safe and yourself as well.
For everything related to bikes, stay tuned to BikesMedia.
By: Yetnesh Dubey


